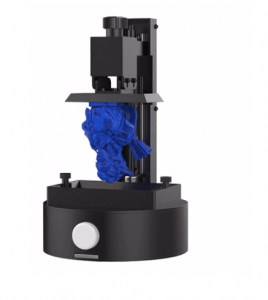
DLP 3D Printing Troubleshooting Guide for Wanhao D7, Anycubic Photon etc.
Please note we have some commission-generating affiliate links in this blog to materials we believe might help solve problems you are having. Good for you, good for us 🙂
DLP 3D printing is pretty easy when you know how! In this guide, we hope to address some of the common issues seen with DLP 3D printing.
If you have other issues, we’d love to hear about them and add to our blog to help others.
Issue # 1 – Print Not sticking to build plate (Nothing prints or partially peeled)
Symptoms of 3D print not sticking to build plate
- The usual symptom is that nothing stuck to the build plate and a blob of cured resin in the bottom of the VAT stuck to the FEP.
Possible Reasons for 3D print not sticking to build plate
- The DLP printer is in an eternal battle where, between layers, the 3D print is expected to peel away from the FEP film in the bottom of the VAT. So you got to make sure that the 3D print is always significantly better stuck to the print bed, than it is to the FEP.
- Keep in mind also that the UV light will cure the resin to the FEP first, then seconds later to the build plate. So the first couple of layers should be very thin, with super long cycle times to ensure that the headstart the UV resin got in terms of curing to the FEP first, is not significant. A related problem that could easily arise is some dirt or little fragments of previous prints stops the build plate from reaching the first layer position.
- Finally, one of the main reasons that FEP is used, is to create a flexible layer that will peel away from the print as the print bed rises out of the VAT to create the separation, so if the printer is not doing so good, it could be that you’re using too rigid of an FEP film. Also, it could be that the FEP is flexing too much and the height which the build plate pulls the 3D print away from the FEP is not enough to break the seal.
Solutions to resolve 3D print not sticking to build plate
Solution 1: Clean the build plate, fep and resin
This is a common issue that is often overlooked. If you’re having printing issues, run the resin through a tea strainer to take out any bits that it may contain. Clean the build plate also (I normally use a blade for cleaning my build plate) and inspect the FEP to make sure no resin has cured there either.
Solution 2: Level the build plate
Usually your printer manual will detail how this should be done for your model of printer. A good example is shown in this video for Wanhao D7
Solution 3: Adjust the settings for your first layers
Of course it may vary printer to printer, but we propose going with extreme settings such as the below, to give you the best possible chance of curing to the build plate, you can always tune the back down again afterwards. This is just to get you printing something.
- Increase your layer cure time to 150 seconds
- Increase the number of “first layers” to about 6 layers.
- Decrease your first layers height to about 20 – 40 microns
- Reduce the lift speed of the first layers
- Increase the lift distance to about 10mm
Solution 4: Roughen the surface of the bed/ build plate.
Warning: Be careful not to overdo it by making it uneven!
Here’s how we suggest you sand the build plate
- Get yourself 120 or higher grit sandpaper and leave a sheet of it flat on the table.
- Place the build plate down on top of the sandpaper
- Ensuring to keep the build plate totally flat on the sandpaper, sand the build plate in circular motions (occasionally changing how you hold the build plate for evenness) until you’ve removed all the paint (if there is paint) or until the surface is more of a matt finish. We estimate 1-2 minutes sanding is probably enough.
WE DID RECENTLY COME ACROSS THE BELOW RECENTLY AND THOUGHT IT COULD BE A VERY COOL SOLUTION FOR RESIN PRINT BED ADHESION!!
Solution 5: Change the FEP layer
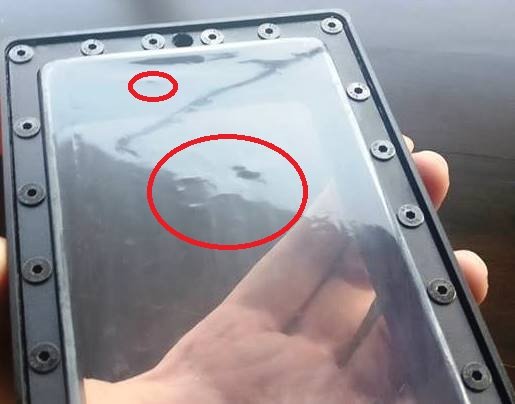
If the FEP layer is damaged, it could result in the FEP being more stuck to the 3D print than the build plate. Also it could be too loose if it has been stretched. See image below of typical damage that people accidentally do to their FEP film in the VAT.
Also it could be too thin / thick of a layer. If you suspect this is part of your issue, we recommend you purchase a new FEP film for your VAT. You can purchase the FEP film in different thickness – if your printer manufacturer hasn’t specified an FEP to use, then we recommend something between 100 micron and 200 micron. Thinner layers then to be easier to print with and/or give better print quality but be warned – you need to be careful not to puncture them.
Your printer manufacturer should specify how to replace the FEP for your model printer, but if not, the below gives you a flavor of what to do. If you’re still unsure, email us and we’ll help you out if we can.
Issue #2: Print layer separation issues in DLP 3D Printing
Symptoms of DLP print layer separation:
- Print has split in some of the layers but print is fully intact or;
- Print has half printed and there’s a big blob of cured resin in the bottom of the VAT
Reasons for DLP Print Layer separation:
- The print should always have good adhesion to the build plate (good thing) but can sometimes also have good adhesion to the FEP (bad thing) causing weaker areas of your prints to pull apart.
- The layer height is very high and/or the cure time is relatively low. This can mean that the layers themselves are pretty well cured but just not to each other!
- A related issue to this might be that the FEP has a poor surface which is no longer transmitting sufficient UV light and/or is now more tacky.
- Bits of the print are poorly supported. Remember the eternal battle that goes on under the sea of resin where the print needs to peel itself away from the FEP each and every layer. If there are thin or vulnerable sections it the print, it could end up that the FEP wins a battle or two. A common example might be where the print pulls away from the supports because the supports are too small at the point where the touch the print.
Solutions to fix DLP 3D Print layer separation:
Solution 1: Change your print settings
A good place to start is reduce layer height and maybe also increase cure time. This will help to ensure the layers are reasonably well stuck together. Also try reducing your lift speed between layers.
Solution 2: Change your FEP film
Inspect the FEP film and ensure that it still has good clarity and free of cloudiness or bumps, tears etc. If it does, replace it. Also maybe consider using a thinner FEP as it will be more gentle to your prints.
Solution 3: Change your 3D model
Revise and improve your print CAD model and bulk up supports in the area where the print was delaminating. Maybe consider increasing the wall thickness of the printed model in the affected area or even reorienting the direction it prints.
Issue #3: Prints are brittle
Symptoms of brittle resin 3D prints:
- Print is quite easy to chip away pieces off.
Reasons for brittle resin 3D prints
- Normally either it’s the resin or it’s over-cured resin. Almost always the first few layers are a little brittle because the resin is intentionally over-cured, to ensure it sticks well to the build plate. Additionally some resins are designed to be more aesthetically optimized rather than mechanical performance.
Solutions to brittle resin 3D prints
Solution 1: Change the resin
- Review the type of resin your using and check it’s expiry date. If for example you’re using a “tough” UV resin and you have no reason to suspect it’s going off (plastics do degrade over time), then I would start looking next to your print settings. If your resin is the problem you think, go in search of a type of resin that better fits your needs or talk to us at L3D and we’ll be happy to make recommendations.
Solution 2: Change your cure settings
- Turn town the cure time. This is generally a good tactic in my view anyway as it will lead to faster and smoother prints. Of course you need to fine the balance so that you don’t under cure. Personally I prefer to start with a high cure time and tune it down a few seconds at a time between prints.
- Reduce post-cure time as this can also have a big impact on turning good prints brittle. This includes how long you leave the prints in the sunshine!
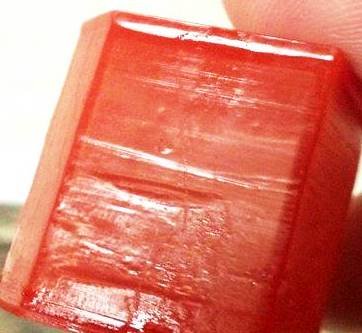
Issue # 4 Outer surface is rippled
Symptoms of ripped or wavy 3D prints from your resin printer
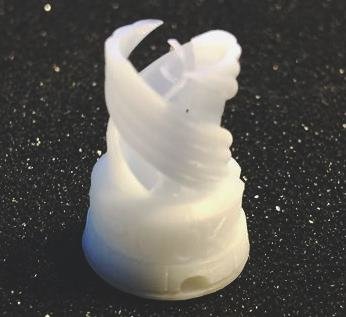
- Entire part is wavy along the height of the printed part. Example shown below.
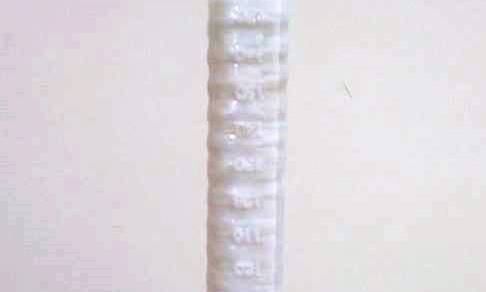
- Entire part is NOT wavy but the layers are clearly varying / showing as shown in example below
Reasons for rippled or wavy 3D prints from your DLP 3D printer
- “Z-wobble” is a common phenomenon with many 3D printers, not just SLA or DLP 3D printers. It’s basically where the slide which the build plate travels up and down on is a little loose and can wobble. What happens to create Z-wobble in SLA and DLP 3D prints is that the build plate moves away from the FEP between layers but doesn’t land in exactly the same position every time it returns the print to the bottom of the VAT for printing on the next layer.
- Remember of course if the print itself is a bit wobbly (e.g. if you’re using a softer resin or it’s poorly supported) that can also have the same effect. Usually it’s more satisfying though to pull the printer apart first and try to fix that 🙂
- In certain circumstances, Z-wobble or part wobble may not be the problem. In the second example above of the cube, you will notice that if you look along the edges, they’re actually quite straight. The issue can also arise that if you’re over-curing layers of the 3D print, it can come across like it’s z-wobble when in fact it’s more related to the extra difficult separation the print needs to do with the FEP between layers.
Solutions to resolve rippled or wavy 3D prints from your resin printer
- If you suspect Z-wobble is the issue, it’s usually caused by one of two things (or both). Firstly, we would recommend tightening up the carriage on the linear rail. Different printers have different approaches for doing this, but luckily these are well documented on youtube! An example is shown below for how to adjust the Z-axis tightness on the Anycubic Photon DLP UV resin printer.
- The second reason Z-wobble can occur is due to the lead-screw being bent or off-center. A good example of how to replace the Z lead screw is shown in the youtube video below for the Wanhao D7.
- If the print looks relatively straight but the print is still significantly rippled, we recommend you fine tune the cure settings for your print – likely you’ll need to experiment but my guess it that your cure time will need to reduce.. Reducing the layer height can also help to get a nicer surface finish.
- You may need to look at the nut on the Z-axis lead-screw as it can have excessive backlash (looseness) that could also lead to wobble-like lines in the print. Usually the nut has a second spring loaded nut which if not fitted correctly (or wears) can cause a problem. A third video is shown below to give you an example of how to reassemble that correctly at least for the Wanhao D7 3D printer.
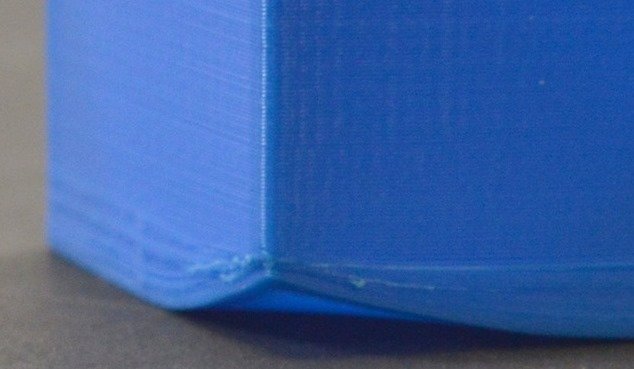
Issue # 5: 3D prints are warped
Symptoms of warped 3D prints from 3D resin printers
- So excuse poetic licence I’m using with the image below – it’s not a DLP print but it illustrates the point. Sometimes you can get warped edges or indeed warping in an entire part. Warping is pretty obvious to diagnose!
Reasons for DLP 3D print warping
- If parts are poorly supported, the can get pulled out of shape while the print is separating from the FEP film between each cure cycle.
- The part might be under-curing and bending as it’s separating from the FEP film also.
- Large parts might be particularly susceptible to warping in DLP 3D printing as usually the UV light is not as strong around the extremities of the build area.
- Post curing can also warp parts, particularly if parts are left too long in IPA and/or if there’s heat involved!
Solutions to DLP 3D print warping
- Ensure parts are well supported and constrained during the printing process
- Turn up the cure time for each layer and increase the dwell time before each lift.
- Try to orient parts to print tall rather than wide.
- Take a more gentle post-cure approach. Use a diluted IPA (let’s say 70% IPA, 30% water) for a shorter time period and cure using a less aggressive light source, (maybe placed further away) or for a shorter time.
- Worth considering to constrain the part for post-cure if it becomes a problem. That might help to hold it’s shape.
- Also consider different resin options. Some resins have less shrinkage than others, which would also help.
Issue # 6: Holes or fine detail are filled in
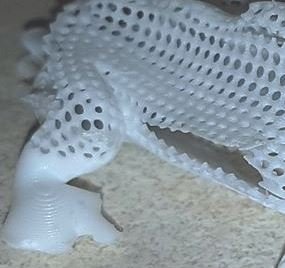
Symptoms of resin blockage issues
- The part you printed was due to have a hole through the part but it was blocked
- Fine detail looks like it was smoothed out
Reasons for resin blockage issues / missed fine detail
- In small holes or crevices in the printed part, the uncured resin will sit in the hole under vacuum unless it has some way to release. In other words, for any hole you add in the printed part, really it needs to have some vent hole to allow the resin to drip out. Think of it this way, if you closed off one end of a drinking straw and lift it out of the drink, good chance it will hold the drink in the straw.
- The orientation of the feature does not allow the resin to drain off the part between layers
- The resin viscosity also plays a significant role in creating fine detail. There is a huge difference in resin “wateriness”. More oily resins simply just wont be up for the job of printing fine details.
Solutions for resin blockage issues / missed fine detail
Solution 1: Design the print for success
- Design the part so that any holes or inset features will not allow resin to pool inside, e.g. you should ensure blind holes have a small air vent hole to allow the resin to drip out and you should ensure such features are facing in a direction that will allow gravity to drain the resin from the 3D print.
Solution 2: Make sure you’re getting a decent wash of the parts before curing
- We find it amazing sometimes at how much the right cleaning technique on a a printed part can sharped it up nicely. We recommend either using a water washable resin or if this is not the case, using a decent cleaning agent before UV curing. Some good examples below. IPA / Rubbing alcohol is a common option but there’s some neat specialized options out there as well such as “Resinaway” from Monocure.
Solution 3: Use a more appropriate resin
- Have a look on forums, datasheets and other places for the most appropriate resin for what you’re trying to achieve. Of course you can contact us also at L3D.ie, we’re happy to make some recommendations.

We do hope you find some value in our article. It’s likely we’ll add to it over time, so please feel free to get in touch about any issues you have while 3D printing and we’ll update the article if the point is relevant to the larger 3D printing community.
If you’re in need of any 3D printing supplies, we also competitively sell 3D printing equipment and consumables in our online shop here!
Disclaimer:
We offer advice to you based on our experience, however we do not guarantee our advice will work for you.
We do not accept any liability or responsibility whatsoever for any issues this article may cause you.
You are responsible for your actions to ensure you work safely and within acceptable/recommended changes allowed by your printer manufacturer.


 You’ll need a laptop or PC ideally with an SD card slot, USB port and HDMI port. That should cover you for most 3D printers.